Programming
- There are two main programming methods supported and tested with the Smart Plant:
ESPHome
Arduino
In both scenarios, you will first need to enter the board into flashing mode. For that, press and hold the Flash pushbutton while you reset the board (pressing once the Reset pushbutton).
Important
For flashing new firmwares, if the OTA support is not available, you will need an external USB-to-TTL module (like this) connected to the Serial port (3.3, GND, Tx, Rx).
Caution
When flashing the board, make sure its only powered from one power source: through the Serial port (by removing the battery connector) or through the battery (but then do not connect the 3.3V pin on the Serial port).
ESPHome
ESPHome is a well known platform for programming ESP-based devices with a very little effort. It is configured via YAML files and supports a wide range of functionalities and sensors.
Important
For using ESPHome, and all its funcionalities, you need to have a Home Assistant (HA) instance running in the same network as your Smart Plant.
Tip
A very easy way to upload and copy files (code or even images) into your ESPHome folder hosted in your HA instance is with the help of the Visual Studio Code integration for HA. This way you can just drag and drop the files over the folder on the Home Assistant’s Visual Studio Code navigation panel on your left.
The Smart Plant already comes with an embeded version of ESPHome, that would only require an OTA update to get it ready to work in your network:
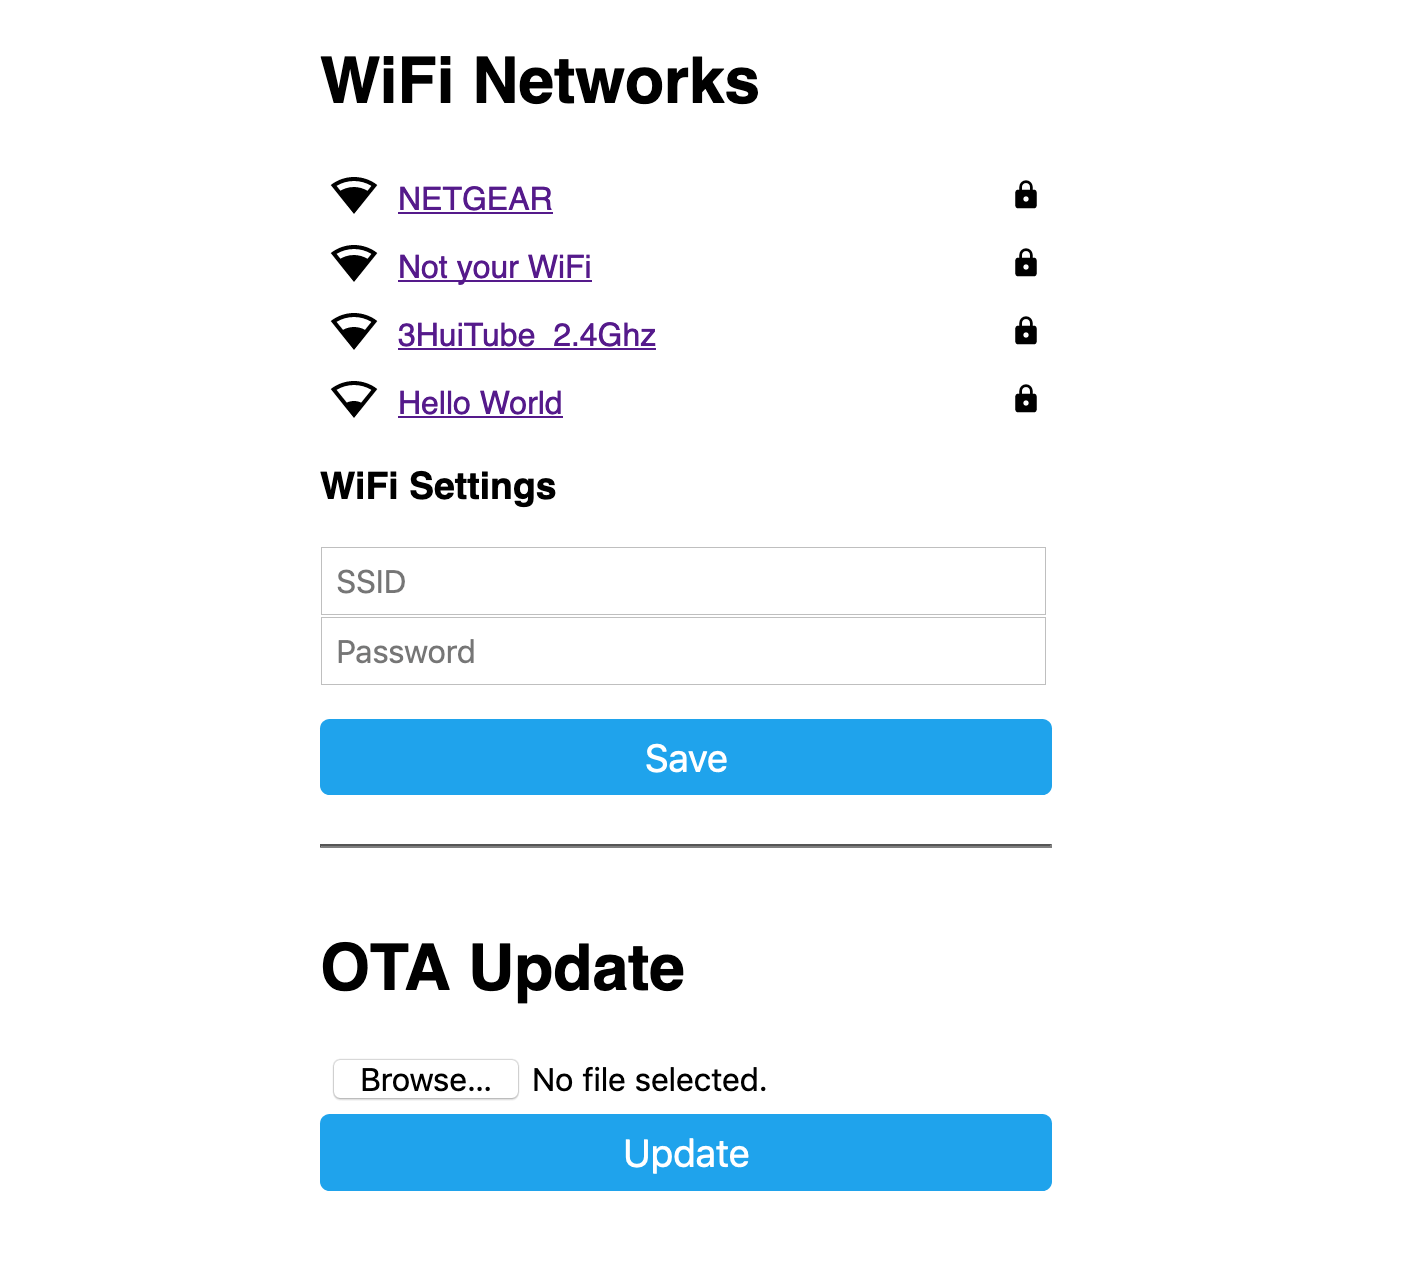
Power the board, and let it run for 1-2 minutes. When the board cannot connect to a WiFi network, it will create a fallback hotspot.
Use a smartphone or tablet and go to the WiFi settings, connect to the recently created Smart-Plant hotspot with the password smartplant.
Access to the captive portal and open the browser if doesn’t pop up automatically.
Enter your network setttings and press Save.
Now, your ESPHome device is ready to be found by Home Assistant in your network. Add it from the ESPHome section to add and edit a customized configuration file.
As an example of such configuration setup (and the one flashed on the factory settings of the Smart Plant) with all the dependencies:
In the folder structure above:
Audiowide.ttfThis is the fonts style of the displayed digits, you can download any of your choice, as long as they are TTF files (I don’t know if ESPHome will integrate OTF soon), and paste it there.
In this case, i used from the Audiowide font.
materialdesignicons-webfont_5.9.55.ttfAs with the previous file, this is a file containing a set of the icons fonts (the battery voltage level).
In this case I used MDI from google (version 5.9.55), but shouldn’t be any problem to look for the latest.
icon-map.hThis mapping file is used to associate a variable name with the icon ID from the previous file. It contains the following code:
 1#include <map>
 2std::map<int, std::string> battery_icon_map
 3{
 4 {0, "\U000F10CD"},
 5 {1, "\U000F007A"},
 6 {2, "\U000F007B"},
 7 {3, "\U000F007C"},
 8 {4, "\U000F007D"},
 9 {5, "\U000F007E"},
10 {6, "\U000F007F"},
11 {7, "\U000F0080"},
12 {8, "\U000F0081"},
13 {9, "\U000F0082"},
14 {10, "\U000F0079"},
15};
Lemon_tree_label_page_1.pngThis is the background image that will be displayed on the e-paper. For having always a styled background image, I made a python script that generates the image of the plant, the title and the parameter gauges out of a JSON config file. Alternativelly, you can use any photo editor of your choice, but keep in mind the display size (296x128 pixel) and the center of each gauges (indicated in the YAML code).

smart-plant.yamlThis is the YAML configuration file, the most important file that configures your ESPHome-based SmartPlant:
  1substitutions:
  2  device_name: "smart-plant"
  3  friendly_name: "Smart Plant"
  4  project_name: "smart.plant"
  5  project_version: "1.2"
  6  ap_ssid: "Smart-Plant"
  7  ap_pwd: "smartplant"
  8
  9esphome:
 10  name: "${device_name}"
 11  name_add_mac_suffix: true
 12  includes:
 13    - libraries/icon-map.h
 14  project:
 15    name: "${project_name}"
 16    version: "${project_version}"
 17  # Initialize the IIC bus immediatelly after the powering the sensors
 18  on_boot:
 19    priority: 600
 20    then:
 21     - lambda: |-
 22        Wire.begin();
 23        delay(100);
 24
 25
 26esp32:
 27  board: esp32dev
 28  framework:
 29    type: arduino
 30
 31# Enable logging
 32logger:
 33
 34# Enable Home Assistant API
 35api:
 36
 37# Enable Over The Air updates
 38ota:
 39
 40#Public location of this yaml file
 41dashboard_import:
 42  package_import_url: github://JGAguado/Smart_Plant/docs/source/files/configuration.yaml
 43  import_full_config: false
 44
 45# Enable fallback hotspot (captive portal) in case wifi connection fails
 46captive_portal:
 47
 48esp32_improv:
 49  authorizer: none
 50
 51improv_serial:
 52
 53wifi:
 54  ap:
 55    ssid: "${ap_ssid}"
 56    password: "${ap_pwd}"
 57
 58
 59i2c:
 60  scl: GPIO22
 61  sda: GPIO21
 62  scan: false
 63  id: bus_a
 64  frequency: 100kHz
 65
 66spi:
 67  clk_pin:  GPIO13
 68  mosi_pin: GPIO14
 69
 70image:
 71  - file: "plant_labels/Lemon_tree_label_page_1.png"
 72    id: page_1_background
 73
 74font:
 75  - file: "fonts/Audiowide.ttf"
 76    id: font_title
 77    size: 20
 78  - file: "fonts/Audiowide.ttf"
 79    id: font_subtitle
 80    size: 15
 81  - file: "fonts/Audiowide.ttf"
 82    id: font_parameters
 83    size: 15
 84  - file: 'fonts/materialdesignicons-webfont.ttf'
 85    id: font_icon_battery
 86    size: 20
 87    glyphs:
 88      - "\U000F007A" # battery-10
 89      - "\U000F007B" # battery-20
 90      - "\U000F007C" # battery-30
 91      - "\U000F007D" # battery-40
 92      - "\U000F007E" # battery-50
 93      - "\U000F007F" # battery-60
 94      - "\U000F0080" # battery-70
 95      - "\U000F0081" # battery-80
 96      - "\U000F0082" # battery-90
 97      - "\U000F0079" # battery
 98      - "\U000F0083" # battery-alert
 99      - "\U000F10CC" # battery-alert-variant
100      - "\U000F10CD" # battery-alert-variant-outline
101      - "\U000F092D" # wifi-off
102      - "\U000F092E" # wifi-strength-0
103      - "\U000F091F" # wifi-strength-1
104      - "\U000F0922" # wifi-strength-2
105      - "\U000F0925" # wifi-strength-3
106      - "\U000F0928" # wifi-strength-4
107      - "\U000F04E6" # sync
108
109time:
110  - platform: homeassistant
111    id: esptime
112
113switch:
114  - platform: gpio
115    pin: GPIO16
116    id: exc
117    name: "Excitation switch"
118    icon: "mdi:power"
119    restore_mode: ALWAYS_ON
120
121
122sensor:
123  # Battery level sensor
124  - platform: adc
125    pin: GPIO35
126    id: VCC
127    internal: true
128    attenuation: 11db
129    update_interval: 1s
130    filters:
131      - multiply: 1.796
132    accuracy_decimals: 5
133    unit_of_measurement: V
134
135  - platform: template
136    name: "Battery"
137    id: battery
138    unit_of_measurement: "%"
139    update_interval: 1s
140    lambda: |-
141      float battery_perc = 100.00 * (id(VCC).state) / (1.44);
142      return (battery_perc > 100.0) ? 100.0 : battery_perc ;
143  # Temperature and humidity sensor
144  - platform: aht10
145    temperature:
146      name: "${friendly_name} Temperature"
147      id: temp
148      icon: "mdi:thermometer"
149    humidity:
150      name: "${friendly_name} Air Humidity"
151      id: hum
152      icon: "mdi:water-percent"
153    update_interval: 1s
154    i2c_id: bus_a
155
156  # Light sensor
157  - platform: adc
158    pin: GPIO33
159    id: illum
160    name: "${friendly_name} Light"
161    icon: "mdi:white-balance-sunny"
162    attenuation: 11db
163    unit_of_measurement: lux
164    update_interval: 1s
165    filters:
166    - lambda: |-
167        return (x / 10000.0) * 2000000.0;
168
169  # Capacitive soil moisture sensor
170  - platform: adc
171    pin: GPIO32
172    name: "${friendly_name} Soil Moisture"
173    id : soil
174    icon: "mdi:cup-water"
175    update_interval: 1s
176    unit_of_measurement: "%"
177    attenuation: 11db
178    filters:
179    - median:
180        window_size: 7
181        send_every: 3
182
183    - calibrate_linear:
184        - 1.25 -> 100.00
185        - 2.8 -> 0.00
186    - lambda: if (x < 1) return 0; else if (x > 100) return 100; return (x);
187    accuracy_decimals: 0
188    on_value:
189      then:
190        - component.update: my_display
191
192display:
193  - platform: waveshare_epaper
194    dc_pin: GPIO27
195    cs_pin: GPIO15
196    busy_pin: GPIO25
197    reset_pin: GPIO26
198    rotation: 270
199    model: 2.90inv2
200    update_interval: never
201    id: my_display
202    pages:
203      - id: page1
204        lambda: |-
205          #define H_LEFT_MARGIN 4
206          #define H_RIGHT_MARGIN 280
207          #define H_CENTER 128
208          #define V_WEATHER 0
209          #define V_CLOCK 1
210          #define V_WIFI 30
211          #define V_VOLTAGE 60
212          #define V_BATTERY  90
213
214          it.image(0, 0, id(page_1_background));
215
216          // Battery
217          float battery_perc = id(battery).state;
218          int battery_range = battery_perc / 10 ;
219          battery_range = (battery_range > 10) ? 10 : battery_range;
220          battery_range = (battery_range < 0)  ?  0 : battery_range;
221
222          it.printf(278, 1, id(font_icon_battery), TextAlign::TOP_LEFT, battery_icon_map[battery_range].c_str()
223          );
224          it.printf(278, 1, id(font_subtitle), TextAlign::TOP_RIGHT,
225          "%3.0f%%", battery_perc);
226
227          // Date
228          it.strftime(278, 18, id(font_subtitle), TextAlign::TOP_RIGHT,
229          "%H:%M %d/%m", id(esptime).now());
230
231
232          // Parameters
233          // Drawing the marker over the gauge
234          float pi = 3.141592653589793;
235          float alpha = 4.71238898038469; // Defined as the gauge angle in radians (270deg)
236          float beta = 2*pi - alpha;
237          int radius = 22;              // Radius of the gauge in pixels
238          int thick = 7;                // Size of the marker
239
240          // *** Moisture ***
241          int min_range = 0;
242          int max_range = 100;
243          int xc = 80;
244          int yc = 50;
245
246          float measured = id(soil).state;
247
248          if (measured < min_range) {
249            measured = min_range;
250          }
251          if (measured > max_range) {
252            measured = max_range;
253          }
254
255          float val = (measured - min_range) / abs(max_range - min_range) * alpha;
256
257          int x0 = static_cast<int>(xc + radius + radius * cos(pi / 2 + beta / 2 + val));
258          int y0 = static_cast<int>(yc + radius + radius * sin(pi / 2 + beta / 2 + val));
259          int x1 = static_cast<int>(xc + radius + (radius+thick) * cos(pi / 2 + beta / 2 + val + 0.1));
260          int y1 = static_cast<int>(yc + radius + (radius+thick) * sin(pi / 2 + beta / 2 + val + 0.1));
261          int x2 = static_cast<int>(xc + radius + (radius+thick) * cos(pi / 2 + beta / 2 + val - 0.1));
262          int y2 = static_cast<int>(yc + radius + (radius+thick) * sin(pi / 2 + beta / 2 + val - 0.1));
263          it.line(x0, y0, x1, y1);
264          it.line(x1, y1, x2, y2);
265          it.line(x2, y2, x0, y0);
266
267          it.printf(xc + radius, yc + 1.7*radius, id(font_parameters), TextAlign::TOP_CENTER,
268          "%.0f%%", id(soil).state);
269
270          // *** Light ***
271          min_range = 0;
272          max_range = 10000;
273          xc = 134;
274          yc = 70;
275
276          measured = id(illum).state;
277
278          if (measured < min_range) {
279            measured = min_range;
280          }
281          if (measured > max_range) {
282            measured = max_range;
283          }
284
285          val = (measured - min_range) / abs(max_range - min_range) * alpha;
286          x0 = static_cast<int>(xc + radius + radius * cos(pi / 2 + beta / 2 + val));
287          y0 = static_cast<int>(yc + radius + radius * sin(pi / 2 + beta / 2 + val));
288          x1 = static_cast<int>(xc + radius + (radius+thick) * cos(pi / 2 + beta / 2 + val + 0.1));
289          y1 = static_cast<int>(yc + radius + (radius+thick) * sin(pi / 2 + beta / 2 + val + 0.1));
290          x2 = static_cast<int>(xc + radius + (radius+thick) * cos(pi / 2 + beta / 2 + val - 0.1));
291          y2 = static_cast<int>(yc + radius + (radius+thick) * sin(pi / 2 + beta / 2 + val - 0.1));
292          it.line(x0, y0, x1, y1);
293          it.line(x1, y1, x2, y2);
294          it.line(x2, y2, x0, y0);
295
296          it.printf(xc + radius, yc + 1.7*radius, id(font_parameters), TextAlign::TOP_CENTER,
297          "%.0flx", id(illum).state);
298
299
300          // *** Temperature ***
301          min_range = -10;
302          max_range = 50;
303          xc = 188;
304          yc = 50;
305
306          measured = id(temp).state;
307
308          if (measured < min_range) {
309            measured = min_range;
310          }
311          if (measured > max_range) {
312            measured = max_range;
313          }
314
315          val = (measured - min_range) / abs(max_range - min_range) * alpha;
316          x0 = static_cast<int>(xc + radius + radius * cos(pi / 2 + beta / 2 + val));
317          y0 = static_cast<int>(yc + radius + radius * sin(pi / 2 + beta / 2 + val));
318          x1 = static_cast<int>(xc + radius + (radius+thick) * cos(pi / 2 + beta / 2 + val + 0.1));
319          y1 = static_cast<int>(yc + radius + (radius+thick) * sin(pi / 2 + beta / 2 + val + 0.1));
320          x2 = static_cast<int>(xc + radius + (radius+thick) * cos(pi / 2 + beta / 2 + val - 0.1));
321          y2 = static_cast<int>(yc + radius + (radius+thick) * sin(pi / 2 + beta / 2 + val - 0.1));
322          it.line(x0, y0, x1, y1);
323          it.line(x1, y1, x2, y2);
324          it.line(x2, y2, x0, y0);
325
326          it.printf(xc + radius, yc + 1.7*radius, id(font_parameters), TextAlign::TOP_CENTER,
327          "%.0f°C", id(temp).state);
328
329
330          // *** Humidity ***
331          min_range = 20;
332          max_range = 80;
333          xc = 242;
334          yc = 70;
335
336          measured = id(hum).state;
337
338          if (measured < min_range) {
339            measured = min_range;
340          }
341          if (measured > max_range) {
342            measured = max_range;
343          }
344
345          val = (measured - min_range) / abs(max_range - min_range) * alpha;
346          x0 = static_cast<int>(xc + radius + radius * cos(pi / 2 + beta / 2 + val));
347          y0 = static_cast<int>(yc + radius + radius * sin(pi / 2 + beta / 2 + val));
348          x1 = static_cast<int>(xc + radius + (radius+thick) * cos(pi / 2 + beta / 2 + val + 0.1));
349          y1 = static_cast<int>(yc + radius + (radius+thick) * sin(pi / 2 + beta / 2 + val + 0.1));
350          x2 = static_cast<int>(xc + radius + (radius+thick) * cos(pi / 2 + beta / 2 + val - 0.1));
351          y2 = static_cast<int>(yc + radius + (radius+thick) * sin(pi / 2 + beta / 2 + val - 0.1));
352          it.line(x0, y0, x1, y1);
353          it.line(x1, y1, x2, y2);
354          it.line(x2, y2, x0, y0);
355
356          it.printf(xc + radius, yc + 1.7*radius, id(font_parameters), TextAlign::TOP_CENTER,
357          "%.0f%%", id(hum).state);
358
359# # Uncomment it if you want the SmartPlant to enter into deep sleep
360# deep_sleep:
361#   run_duration: 10s
362#   sleep_duration: 3600s
Arduino
If you are still interested in programming directly with the Arduino IDE, the procedure is no different than with any other ESP32 devices:
Open the Arduino IDE and go to File -> Preferences option.
Add to the Additional Boards Manager URSLs the url:
https://raw.githubusercontent.com/espressif/arduino-esp32/gh-pages/package_esp32_index.json
Close the preferences and open in the menu Tools -> Board -> Boards Manager.
Search for esp32 and install it. This might take some time.
Now you can select the board ESP32 Dev Module as the target board. Leave the rest of parameters by default.
Select the correct port and remember to enter the board into flashing mode before uploading the sketch.